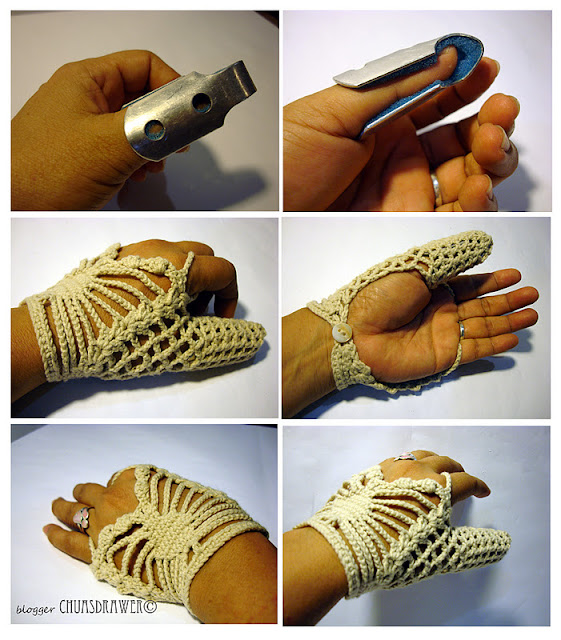
I enter 2012 with a trigger thumb. It got worse that I need to bandage the joint section to stop it from bending. Then Sheerah got me a little gadget to support the thumb to prevent the joint from locking. However, it slipped out of my thumb when I moved in my sleep so I crocheted this glove to hold the gadget onto my thumb.

I am happy with my glove :)
Here is the pattern for those who may be interested.
Abbreviation:
ch = chain
dc = double crochet
st = stitch
sl st = slip stitch
ROW 1: Crochet the 1st row of chains that measures the circumference of your wrist. Mine is 45ch.
ROW 2: ch1 and sc in each ch till 42nd st; ch2; skip 2st and sc into the last ch (this is the button hole. You can adjust the button hole size to fit your button)
ROW 3: ch1; turn; sc; skip 2st; dc2; ch1; dc2; ch15; skip 17st; dc1; ch3; dc1; ch15; skip 17st; dc2; ch1; dc2; ch1; sc into the last ch
ROW 4: Turn; ch5; dc2; ch1; dc2; ch13; sc into each of the 3ch space; ch13; dc2; ch1; dc2
ROW 5: Turn; sl st into the 2dc; sl st into the 1ch space; ch3; dc1; ch1; dc2; ch11; (Increase) sc2; sc1; sc2; ch11; dc2; ch1; dc2; ch5; sl st to center ch of the 5ch space
ROW 6: Turn; ch5; sl st to center of 5ch space; ch5; dc2; ch1; dc2; ch9; sc2; sc into each st and sc2 to the last st; ch9; dc2; ch1; dc2
ROW 7: Turn; sl st into the 2dc; sl st into the 1ch space; ch3; dc1; ch1; dc2; ch7; sc into each st; ch7; dc2; ch1; dc2; *ch5; sl st to center ch of the 5ch space* repeat
ROW 8: Turn; do three 5ch space; dc2; ch1; dc2; ch7; (Decrease) skip 1st; sc into each st and skip the last st; ch7; dc2; ch1; dc2
ROW 9: Turn; sl st into the 2dc; sl st into the 1ch space; ch3; dc1; ch1; dc2; ch9; skip 1st; sc into each st and skip the last st; ch9; dc2; ch1; dc2; do three 5ch space
ROW 10: Turn; do four 5ch space; dc2; ch1; dc2; ch11; skip 1st; sc into each st and skip the last st; ch11; dc2; ch1; dc2
ROW 11: Turn; sl st into the 2dc; sl st into the 1ch space; ch3; dc1; ch1; dc2; ch13; skip 1st; sc into each st and skip the last st; ch13; dc2; ch1; dc2; do four 5ch space
ROW 12: Turn; do five 5ch space; dc2; ch1; dc2; ch15; skip 1st; sc into each st and skip the last st; ch15; dc2; ch1; dc2
ROW 13: Turn; sl st into the 2dc; sl st into the 1ch space; ch3; dc1; ch15(ring for the little finger); dc2; skip 2st; sc1; (*skip 2st; dc3 into same st); sc1; repeat(*); dc2; skip 2st; sc1; (*skip 2st; dc3 into the same st); sc1; repeat(*); sc1dc2 into 1ch space; ch20(ring for the index finger); do five 5ch space
ROW 14: urn; sl st into 2st of the 5ch space; ch10; sl st into center of the 5ch space of the other side to form a circle for the thumb. You can adjust the size by the number of stitches. I have to make it fit my thumb splint so it is bigger than normal.
ROW 15 (this is starting on the thumb): do 5ch space all round (total 7 spaces)
ROW 16: sl st into 2dc; ch4; (*skip 1st; dc1; ch1); repeat (*) all round; sl st to 3rd ch
ROW 17: ch4; decrease by dc 2 tog; ch1; do another decrease; ch1; (*skip 1st; dc1; ch1); repeat (*) all round; sl st to 3rd ch (I made 2 decreases on this row)
(From here make adjustment by decreasing or increasing stitches to fit your thumb size.)
ROW 18: ch4; (*dc1; ch1; dc1); repeat(*) all round; sl st to 3rd ch
ROW 19: repeat row 18
ROW 20: make 1 decrease
ROW 21: make 1 decrease
ROW 22: make 2 decrease
Close by stitching the center of the ends together.
NOTE: Please do not sell the pattern, you may sell the finished product, giving credit and linking it to the pattern creator. Thank you.

No comments:
Post a Comment