Sunday, July 31, 2011

CROCHET FLOWERS

Sheerah gave me this canvas bag which she got in Jakarta. It is a nice plain color and it just makes me want to create something to make it look even better. So here is the outcome overnight.


Before.....


After....


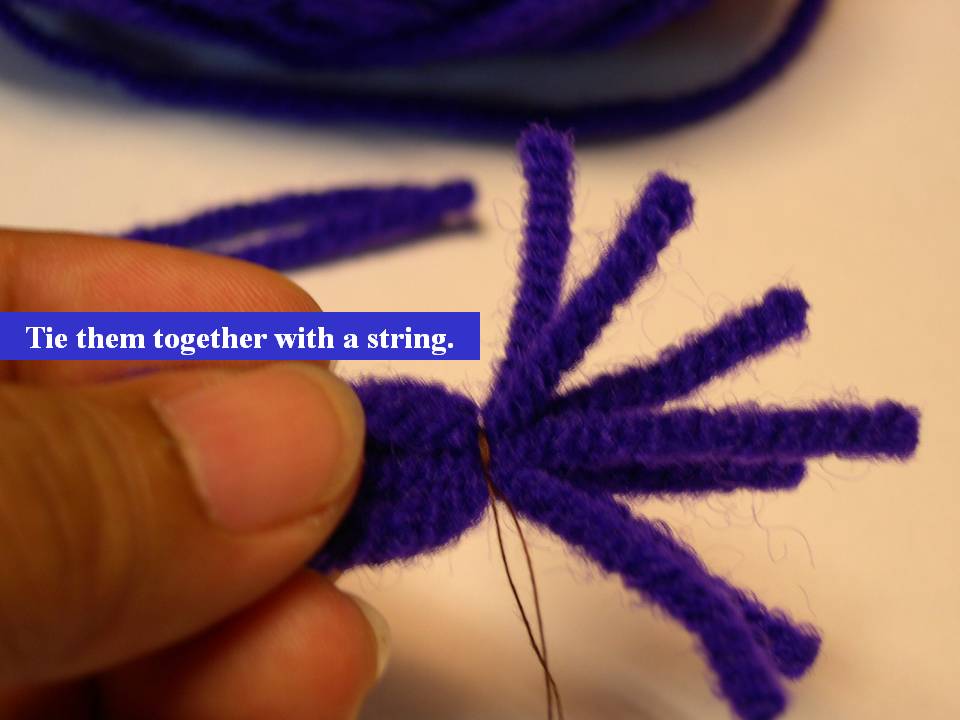
The flower stem pattern:
Draw lightly with a pencil or use a fabric pencil (a better choice) and crochet a line of chain stitches along the line into the canvas. This may take quite an effort but worth it.

OR you can crochet a string of chain and hand sewn with a needle and thread to place the chain onto the line drawn.

After doing the stem, then attach the flowers and petals onto the bag using a needle and thread. I sew a bead to each flower to finish off.


Leaf Pattern:
ch 8; ch 1; sc to last ch; hdc 2 into next 2 ch; tr 2 into next ch; hdc 2 into next 2 ch; sc 3 into next ch.

Turn to work on the other side to form the leaf.

hdc 2 into next 2 ch; tr 2 into next ch; hdc 2 into next 2 ch; sc into next ch; slip stitch to 1st ch and tie.


Flower Pattern:
Do a magic loop and crochet...

ch1: (sc; ch 10); make 5 loops for petals; slip stitch to 1st ch.

ch 1; sc 3; hdc 2; dc 2; tr 3; dc 2; hdc 2; sc 3; make 5 of this petal and slip stitch to 1st ch; tie


The flower is made from a bundle of rope which I bought from a hardware store.

I have to unwind and roll the rope into 2 empty bottles before I can start my crocheting. I bought 2 sizes and I used the finer one to crochet the flower. The texture is stiff but I like the color and the effect it has...dry flower effect? Anyway, it suits my bag so well.


This is the thread I used for the leaves and stem. This color matches the flower very well. Sheerah got this from Daiso.

Well, I am very pleased with my creation :) Happy crocheting for those of you who like to try it out.


NOTE: Please do not sell the pattern, you may sell the finished product, giving credit and linking it to the pattern creator. Thank you.

POUCH FOR NOKIA E66_2

Here is another pouch I made for my E66.


Tuesday, July 12, 2011

MAKING A FINGER PUPPET


You can use a man's handkerchief or a piece of fabric of similiar size or slightly larger for the finger puppert's clothing.  Fold the handkerchief into halves diagonally, insert your index finger(for the neck) to the centre with the thumb and middle finger to the two sides(for the puppet hands).  Hold the fabric to the side fingers with a band as shown in the pic.  You can also make little hand puppet clothing to dress it up.


Monday, July 11, 2011

MAKING A BIG MOUTH SOCK PUPPET

Here is another sock puppet with more details in making the mouth.


ENJOY YOUR PUPPET!


MAKING A SIMPLE SOCK PUPPET

Here is a simple sock puppet from an old pair of socks.


Hope you find this useful and enjoy making your puppet!

Friday, July 8, 2011

MAKING A SIMPLE MOUTH PUPPET

Here are the pics I have compiled to show how the mouth puppet was made.
The pattern can be downloaded at the following link:  http://www.scribd.com/shelf

I am using an old t-shirt.   It is better to use an ADULT-LARGE size so you have enough for the whole pattern. 

PREPARING THE FABRIC: Cut out the pattern leaving a 1cm seam all around.  However, take note that you need only to leave 1/2 cm seam around the fingers.  Then sew all around leaving the mouth open as shown in B.  Take note to cut as close to the valley between the fingers as possible before turning them out (shown in A). 


THE MOUTH PIECE: Trace out the mouth pattern on a piece of hard card(A).  I am using card from a box for this.  Trace another one on a piece of black felt and glue the two pieces together(B).  Lightly cut a line across the card(C) to make it bendable as shown in D.


THE MOUTH: Apply glue along the edge around the mouth piece on the black felt side and place the edge of the mouth fabric over the edge where the glue is applied(B and C).  Cut the foam piece for the head as shown in D (more details in the pic below).


THE HEAD: Apply cement glue along the two inside edges.  Use a piece of hard card to spread the glue on both edges and leave it for a min before placing the two edges together (B and C).  Then gather the fabric together so it is easier to insert the foam inside the head over the upper jaw.


THE BODY INSERT:  Trace out the pattern for the foam body and cut it out with a sharp blade (A and B).  Apply cement glue to the two ends and join them together(C and D).


Insert the ready foam body into the sewn fabric.


THE TONGUE: Trace out the tongue patterns on a piece of bright-colored felt(B).  Glue them to the inside of the mouth piece as shown in C.  Cut out a piece of the lower jaw from foam(D) to insert to the lower jaw.


THE ARMS:  Fill both arms with poly fiber(A).  Sew a line across half way where the elbow joint(B) is so the arms can be bent(C).  Gather the opening and sew them closed, taking care to push the edges inside(D).


Apply glue to the end of arm where it attaches to the shoulder(C).


THE FACE:  I cut a ping pong ball into halves and wrap one half in a piece of fabric and glue it to the face near to the mouth and glue two googly eyes to complete the face(A).  Take note of the difference it will make when the eyes are placed closer together(B) and further apart(D).  Use furry material or wool for the hair. 

Dress it and you have a simple mouth puppet ready for the show!